How To Cut Chair Rail - Chair Rail Cut Out Stock Images Pictures Alamy - Measure and cut any miters for the chair rail, especially if you are turning any corners that are not 90º.. Turn the miter to the same angle on the other side of the platform, and cut the second corner piece in the same fashion. When you cut the return, leave the saw blade down until the blade stops spinning to avoid nicking the return as it falls away from the blade. It is partially used in order to help protect the wall from chair backs rubbing against them or being bumped into and because of this, it eventually gets worn and chipped. Learn a quick and easy way to make your end caps for a chair rail.check out our wall boxes tutorial: Miter cut the other end of the chair rail so that the cut edge faces inward toward the wall and the long edge is on the outside.
Set the first piece of chair rail on the saw platform, with the piece standing on its bottom edge (the way it will go on the wall), with the angle making the front of the trim shorter than the back. Even trim allows to sit and acclimate for weeks will still shrink even a little. When you have a chair rail, it can be hard to figure out whether to use the same paint colour on the upper and lower portion of. Cut the chair rail end to the specified angle. It is partially used in order to help protect the wall from chair backs rubbing against them or being bumped into and because of this, it eventually gets worn and chipped.
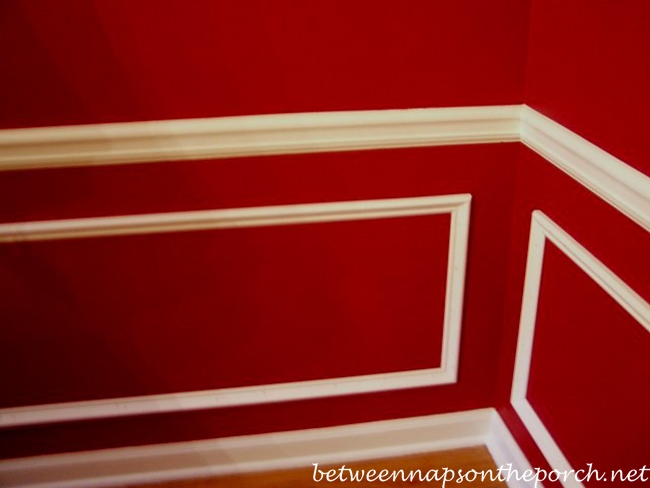
Dining Room Upgrade Add Picture Molding Beneath A Chair Rail Between Naps On The Porch from betweennapsontheporch.net Next is to make another 45 degrees inside angle cut and then cut along the bottom edge of the smaller amount. To end chair rail at an archway or corner, form a return an inch from the corner. Demo is the fun part. Put trim around your door, and then but the chair rail into the door trim. The last step for how to cut an end cap for molding is to attach the filler to the original piece of chair rail, or whatever type of molding you are using. It's now a great way to add some character to your boring, basic walls. Chair rail isn't just for the dining room anymore! The addition of chair rail molding is an easy and fairly inexpensive way to dress up a room.
One significant cut to remember as well is to make end caps for the chair rail.
The benny with a coped cut is it hides joint shrinkage way better than other method i've seen or tried. Measure and cut any miters for the chair rail, especially if you are turning any corners that are not 90º. Put trim around your door, and then but the chair rail into the door trim. We used our air compressor nailer combo to attach both the chair rail and molding to the walls. To be fast, you can use something like dap rapid fuse. The resulting sliver of trim will be glued to the end of the rail to cover the end grain and return the profile to the wall. This cuts the caulk and prevents the walls from getting torn up. Set the first piece of chair rail on the saw platform, with the piece standing on its bottom edge (the way it will go on the wall), with the angle making the front of the trim shorter than the back. Turn the miter to the same angle on the other side of the platform, and cut the second corner piece in the same fashion. Chair rail moldings are a type of trim that is commonly used in order to go around the perimeter of a wall. Cut the chair rail end to the specified angle. It's like a super glue for woodworking project. Place the chair rail molding on a miter saw on the left side of the blade.
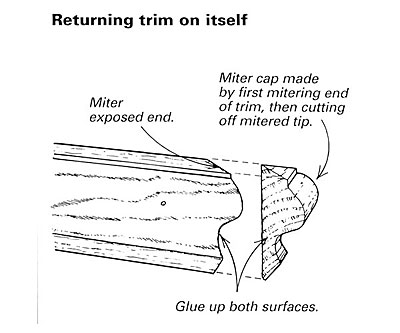
To end chair rail at an archway or corner, form a return an inch from the corner. The addition of chair rail molding is an easy and fairly inexpensive way to dress up a room. First, cut a return piece the width of the chair rail. It's now a great way to add some character to your boring, basic walls. Next is to make another 45 degrees inside angle cut and then cut along the bottom edge of the smaller amount.
Correct Height For Chair Rail And Wainscot Jlc Online from cdnassets.hw.net It's now a great way to add some character to your boring, basic walls. The last step for how to cut an end cap for molding is to attach the filler to the original piece of chair rail, or whatever type of molding you are using. The process is simple, a clean 45° back cut, a steady hand, a stabile work surface and a sharp coping saw blade. You will need to take separate measurements for each. It will set that piece in place and let you attach it to the wall fastest. Glue together before nailing to the wall. First, cut a return piece the width of the chair rail. Place the chair rail molding on a miter saw on the left side of the blade.
It should be standing on edge with the profile facing away from the fence.
Chair rail moldings are a type of trim that is commonly used in order to go around the perimeter of a wall. Watch as the #verycoolguys of construction show you how to install chair rail, in a proper molding installation.today we show you, step by step, how to insta. Next, make an opposing outside miter cut from a scrap piece of chair rail, and then square cut this piece to the thickness of the chair rail. We used our air compressor nailer combo to attach both the chair rail and molding to the walls. Removing the chair rails from the walls. Glue together before nailing to the wall. Use a stud finder and mark off where the studs are so you know where to nail in the trim. The 45 degree cut on the return will abut the chair rail, and the 90 degree cut will sit flush with the wall (or in this case, the side of my bookcase. Saw through the edge of the chair rail. Take a piece of the chair rail and put it into a miter box. It is partially used in order to help protect the wall from chair backs rubbing against them or being bumped into and because of this, it eventually gets worn and chipped. Set the chair rail inside the miter box and line up properly to the needed angle. Give the molding a light sanding to smooth the joints and puttied nail holes
Otherwise, cut a piece of chair rail about an inch long and mitered, then miter the end of the longer piece and glue them together to make a return. Set the chair rail inside the miter box and line up properly to the needed angle. Turn the miter to the same angle on the other side of the platform, and cut the second corner piece in the same fashion. When you have a chair rail, it can be hard to figure out whether to use the same paint colour on the upper and lower portion of. You will need to take separate measurements for each.
Installing Chair Rail Fine Homebuilding from www.finehomebuilding.com Where two chair rail pieces meet at an inside corner, one piece is cut square and butted into the wall, while the other piece must be coped to closely fit the intersecting molding's profile (image 3). One significant cut to remember as well is to make end caps for the chair rail. It's like a super glue for woodworking project. Turn the miter to the same angle on the other side of the platform, and cut the second corner piece in the same fashion. You will need to take separate measurements for each. It will set that piece in place and let you attach it to the wall fastest. Measure and cut any miters for the chair rail, especially if you are turning any corners that are not 90º. When the stairs are at different levels or where there is a landing, angles are cut on the ends of the chair rail to join them together.
It will set that piece in place and let you attach it to the wall fastest.
Turn the miter to the same angle on the other side of the platform, and cut the second corner piece in the same fashion. Chair rail moldings are a type of trim that is commonly used in order to go around the perimeter of a wall. To be fast, you can use something like dap rapid fuse. It will set that piece in place and let you attach it to the wall fastest. Once confirming the correct fit, install your chair rail along your painters tape. Cut the chair rail end to the specified angle. It's like a super glue for woodworking project. A chair rail, also known as a dado rail, is a horizontal piece of trim that usually runs the perimeter of a room approx 36″ from the floor, but can also be awkwardly placed on a single wall (popular in the '90s). It's now a great way to add some character to your boring, basic walls. Watch as the #verycoolguys of construction show you how to install chair rail, in a proper molding installation.today we show you, step by step, how to insta. When you have a chair rail, it can be hard to figure out whether to use the same paint colour on the upper and lower portion of. You can also use a miter saw for cutting the rails. When the stairs are at different levels or where there is a landing, angles are cut on the ends of the chair rail to join them together.